Tuesday, October 30, 2018
Research Tools For Students and Teachers
My library has some amazing resources that can be used for research projects. I know it is tempting to have students get the bulk of their research from Google, and don't get me wrong, there are some amazing resources out there but it is necessary and important for students to gain exposure to a multitude of resources. In this blog post, I would like to explore two of my favorite databases


Are you using either one of these databases? I would love to hear how you are using them with your students.
- EBSCO Explora
- Sirs Discoverer
The key to using these resources in my space is our MackinVIA program. MackinVIA is a program our library uses to house all of our digital materials. Students are able to easily login using their Google usernames and passwords. The program includes databases, ebooks, and audiobooks. Most of the ebooks are available for one user at a time, and can be checked out up to three weeks. Students and teachers can even download the ebooks, using the MackinVIA app. This is a fantastic program and I highly recommend using this free program. I wrote a blog post on this program earlier last year. You can view it here .
EBSCO Explora

EBSCO Explora is a general database that we receive through the New Jersey State Library. The program is divided into three separate databases including:
- Explora For Students (5th/6th grades)
- Explora (7th and 8th grades)
- Explora for Educators
When researching with your students I recommend option one or three, depending on which grade you choose.
Some of the highlights of this program include:
- Searching by topic
- A specific search box
- The ability to get full-text documents (Magazines, Newspapers, Journals)
- Students can send an entire article to their Google Drive
- Ability to limit your search by publication date
- Ability to limit your search by Lexile Range
- Ability to listen to the article (Speech to Text)
- Citation information available, and easy to copy and paste
Here is an excellent tutorial I found on using Explora, created by EBSCO.
SIRS Discoverer
SIRS Discoverer is another wonderful general database, specifically geared towards middle school students. Our school has chosen to purchase this program, because it is one of the only programs that is available for this level. You will find that it has many of the same features as Explora, but unlike Explora the articles are more specific to middle school level.
Some of the highlights of this program include:
- A specific search area
- Search by topic
- An Explore Features area which includes
- Animal Facts
- Current Events
- Pro/Con Leading Issues
- Country Facts and Maps
- Nonfiction Books
- Science Fair Explorer
- An Advanced Search area
- Ability to limit search by media
- Ability to limit search by grade level
- Ability to limit search by Lexile Level
- Full text articles
- Ability to send articles to students through Google Classroom
- Ability for students to save articles to their Google Drive or print.
- Citation information
- There is also an Educators Resources section
Here is a video with more information about using SIRS
Just recently I was asked to be part of the Proquest (Publishers of SIRS Discoverer) Advisory Board. This is very much an honor end exciting to be part of decisions they are making with their various databases.
Here is the video of the presentation I put together on MackinVIA and these databases.
Are you using either one of these databases? I would love to hear how you are using them with your students.
Saturday, October 27, 2018
STEM Challenge: Build a Marble Maze
My students really enjoy participating in the Monthly STEM Challenges that are available to them during an open media center time. Even though we are a middle school, our students still have a daily recess. This really gives them time to unwind, so they can focus on their academics. During recess students can sign up to come to the library. The STEM Challenge is just one of the activities students can participate in. Students can also use a computer, study, check out a book, read, play a board game, or use the makerspace. The Monthly STEM Challenge consists of a challenge that has a STEM focus. Students are given a month to work on this challenge. At the end of the month, the challenges are put on display, so that students in the school can vote on their favorites. A small prize and certificate is given to all students who participate in the challenge.
In September our STEM Challenge was Create a Marble Maze. Students were provided with:


In September our STEM Challenge was Create a Marble Maze. Students were provided with:
- Cardboard
- Straws
- Tape
- Glue
- Popsicle Sticks
I also like to create a STEM Planning sheet. Students need to plan out their project prior to creating. This includes deciding which materials they will use, sketching their design, and after they complete the challenge, figuring out what worked and what failed. I tell my students that they can not participate in the challenge, if they do not fill out this paper. This is how I add in the engineers design process. I am a firm believer that this process should be a part of any and all making.
Here are some pictures of some of my students who participated and their finished challenges.


As you can see this was a lot of fun. My students really enjoyed themselves. It is always amazing to me that students are willing to give up their recess and own time to participate in these challenges. It shows me that students are motivated to create and design, and is very encouraging.
Sunday, October 21, 2018
Game Design With Bloxels
Bloxels is an innovative way for students to create video games. The games can be turned into an educational game simply be adding white story blocks to the game. How many times do we ask our students to showcase what they learned? A book report, a science topic, a moment in history, a math lesson. The possibilities are endless. Next time instead of going for the traditional Google Slides or Poster try out Bloxels.

So you are probably wondering, how does Bloxels work? Your students really only need a Bloxels Kit (Our library has 11 of them, an IPad, and the Bloxels (free) app. To begin, students create their game board by inserting the colored cubes into the Bloxels black board. The colors are extremely important when designing the game board.
Green = Terrain
Blue = Water
Purple = Enemies
Orange = Exploding
Red = Danger
Yellow = Coins
Pink = Powerups
White = Story blocks

Once your students have finished building their game boards, they are able to take a picture of the board using the Bloxels App. The Board will now magically be added to your Bloxels program. Students can easily assign meaning to some of the types of blocks such as Enemy Blocks, Powerups, and Story Blocks. This is completed through the Configure setting.
Once students have configured their game, they can choose to begin playing their game, or create their own game character. The process for creating their own game character is very similar to creating a game board. Students can build a game character using the Bloxels black board and take a picture. The picture that is taken turns that character into a real game character, The game character can then be inserted into the game and students can begin playing the game.
Bloxels has included a teachers manual with directions for playing, as well as lesson plans. This is available both in print and online.
Recorded Version of Bloxels Presentation
Thursday, October 11, 2018
What's New With Google Classroom?
Over the summer, Google made some exciting changes to Classroom. Some are extremely noticeable and others not so much. If you are using Classroom on a regular basis, you may have already noticed the changes.
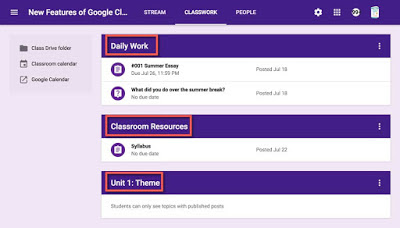
1. The Stream Screen Has Changed
In the past, the Stream Screen was a place for students to view all assignments, etc. It is now only a place for announcements or comments. Since the switch, I have not been using this area a lot. I make very few announcements and very few of my students comment. If you are making many announcements and allowing student commenting, this area may work for you.


2. The Addition of the Classwork Screen
The Classwork Screen has been added, and Students is now called People. The Classwork Screen is the area where all assignments, and questions are added. Teachers can also list materials. This makes it super easy to post assignments. Teachers can also categorize by topic. This is my favorite addition to the new Google Classroom. It is so much less confusing when posting assignments.
Still need more information? Please watch my video below with all the information that was presented at a live presentation I shared with my staff.
3. The About Tab is Gone (Sort of)
The old version of Google Classroom had an About Tab. This was a place to share information about your class, as well as to list materials that were used on a regular basis. Teachers can now list Materials under Classwork. About can be found on the Stream Screen underneath your Header, now as a link. When you click on About, you will receive information about the Class Code. This is a more convenient way to push out the Class Code to your students.


4. Settings All in One Place
The settings for Classroom are now all available in one place. No more searching for how to set certain things up. You can find settings at the top right hand side. Here you can do things like reset the class code, decide whether to show deleted items, and set up guardian summaries.

5. Ability to Copy a Class
Google Classroom now gives you the ability to copy a class. Simply go the menu that shows all of your Google Classrooms and click on the three dots. You will see a choice to copy. Copying does not copy your students or announcements, but will copy everything else. This is a great timesaver, if you are doing the same curriculum/projects on a yearly basis.


6. Feedback/Grading Workflow
Google Classroom has always given you the ability to grade assignments, but it used to be much more difficult to do this. Now each student is listed. You will notice as you scroll through that each assignment pops up. Teachers are also able to give instant feedback.

7. Ability to Turn Off Notifications
Google Classroom has always allowed you to turn off email notifications for all of Classroom. Now teachers are able to turn off notifications for a specific class. To do this, you must click on the menu bar to the left. You will see notifications at the bottom. Once you click on Notifications, you will see choices for all of your classes. If you keep scrolling down you will see Notifications for individual classes.


Sunday, September 16, 2018
Breakout Edu Fun
Last year, another teacher from my district I were lucky enough to get funded through our Education Foundation for six of the Breakout Boxes and a year long subscription to their games. Most of the teachers at my school were shown on an inservice day how to facilitate a game. In case you don't know how Breakout works, here is some quick info.
Breakout Edu is very similar to the Escape Room Experience. Students are given a scenario that they must escape from. Clues are both dispersed throughout your room and inside of locked boxes. Students must solve a series of clues in order to physically break open the locked boxes. Students work in groups to complete their tasks. There are games available for virtually every subject available. Preparing the boxes can take a little bit of your time, but the end result is completely worth it. Students are engaged and excited to learn! There are also digital games available. In these games, students open up a virtual box by solving clues.
Here is the presentation another colleague I created and presented last year when we shared on Breakout Edu
This past week, I worked with our 8th grade language arts teacher on a library orientation. We decided to do a Breakout game with her four classes, in order to keep her students engaged. Her students learned the same things they would have learned through a traditional slideshow, but it was so much better because of how involved they were in the activity. When I started looking into a game to play, I could not find one that worked in a 15-20 minute timeframe, so I wrote my own game. It was really easy, and really gave me a chance to be creative.
Here was the Game: Breakout of the Library!


 <
<
Breakout Edu is very similar to the Escape Room Experience. Students are given a scenario that they must escape from. Clues are both dispersed throughout your room and inside of locked boxes. Students must solve a series of clues in order to physically break open the locked boxes. Students work in groups to complete their tasks. There are games available for virtually every subject available. Preparing the boxes can take a little bit of your time, but the end result is completely worth it. Students are engaged and excited to learn! There are also digital games available. In these games, students open up a virtual box by solving clues.
Here is the presentation another colleague I created and presented last year when we shared on Breakout Edu
This past week, I worked with our 8th grade language arts teacher on a library orientation. We decided to do a Breakout game with her four classes, in order to keep her students engaged. Her students learned the same things they would have learned through a traditional slideshow, but it was so much better because of how involved they were in the activity. When I started looking into a game to play, I could not find one that worked in a 15-20 minute timeframe, so I wrote my own game. It was really easy, and really gave me a chance to be creative.
Here was the Game: Breakout of the Library!
- Students were given a clue with a key to a small box taped to the clue. The clue led them to the library Teen Fiction shelves where a small box was put.
- Inside the small box was another clue which told them to look up a specific book title in Follett Destiny (our new online catalog system)
- Once they found the call number on the catalog they had to go over to the shelf and find that book.
- Once that book was found they found a QR code inside the book.
- They scanned the QR code with the IPad, which opened them up to a Google Forms survey
- Once they completed the survey, they were given a response to their survey that said "Thank you for filling out this DEAR form"
- They had to use their brains to figure out that Dear was really Read backwards and that word would open up the large box which held a Congratulations We Broke Out Certificate, as well as jolly ranchers.
* Sorry I do not have the QR Code saved but here is a link to a website I use to create my own QR codes https://www.the-qrcode-generator.com/
Here are some pictures of our Breakout Fun:


Are you using Breakout in your library or classroom? I would love to hear about any exciting Breakouts you have created.
<
Monday, September 3, 2018
Great Start To a New School Year
It's the night before my first day of 2018/19 school year, and reality is finally sinking in. This was truly a summer of learning. I started out by attending the Raspberry Picademy in Jersey City, NJ, attended and presented at ISTE in Chicago, attended the Birdbrain Technologies Training in Pittsburgh, PA in July, and presented at many of the local New Jersey conferences during my break. I was also able to take a couple of beach vacations with my family to take advantage of my time off.
This summer, I was really inspired by so many of the Facebook posts on my many librarian groups. Many of the posts created menus of their library services. We have had many changes to our library over the summer and I decided to promote this to my teachers. The theme I choose was Have a Sweet Year: Let's Collaborate. I also decided to use my Bitmoji for all of the items I created. If you haven't used Bitmoji, it is a great way to make things adorable and really give them a personal touch. It's easy to create an account by simply going to https://www.bitmoji.com/ Once you create your Bitmoji you can add an extension to your desktop/laptop and even use it on your phone.


This summer, I was really inspired by so many of the Facebook posts on my many librarian groups. Many of the posts created menus of their library services. We have had many changes to our library over the summer and I decided to promote this to my teachers. The theme I choose was Have a Sweet Year: Let's Collaborate. I also decided to use my Bitmoji for all of the items I created. If you haven't used Bitmoji, it is a great way to make things adorable and really give them a personal touch. It's easy to create an account by simply going to https://www.bitmoji.com/ Once you create your Bitmoji you can add an extension to your desktop/laptop and even use it on your phone.
The first step I took was creating a menu of services the library can offer the teaching staff.
I used one of my favorite programs, Canva to create my menu. Canva makes it so easy with their easy to edit templates. They even have Menu Templates. If you haven't used Canva, I recommend it for any of your desktop publishing needs. Here is my final product.

Two of the biggest changes our school library has had over the summer include a new website and switching from Alexandria to Follett Destiny. I decided to promote both of these new programs to my staff by creating a bookmark with all the information. I also created a bookmark that says Have a Sweet Year I used the Google Drawing program for this. It seems that Google Drawing is the one Google program that is under-used. You can create anything with Google Drawings and the ability to collaborate, like all of the other Google products, makes it one of my top program picks. Here are my completed bookmarks.


To package everything up, I purchased some adorable colored bags at the dollar store (4/$1), some avery labels to print a cute message on the bags, and some candy. I plan to hand the bags out to teachers individually tomorrow while teachers are working on their rooms. This will give me an opportunity to get to know my new teachers, and have some awesome conversations with teachers I already know.


Have you created something amazing for your teachers? I would love for you to share with me what you are doing.

Friday, June 29, 2018
Our Quest For NJ Future Ready Certification
A little over a year ago, I found out about NJ Future Ready Schools. My friend Elissa Malespina, mentioned her involvement with the program through a Twitter conversation. I was well aware of Elissa's involvement in the national future ready initiative. Elissa is the middle school librarian at Somerville Middle School in New Jersey. In addition to working as a school librarian, she is the ISTE Librarians President, a national presenter, and has received numerous technology and library educational awards. Here is one of Elissa's presentations on Future Ready Librarians.
What is Future Ready Schools?
Future Ready Schools is a national initiative which helps K-12 public, charter and private schools prepare students for their future careers, college experiences, and citizenship by maximizing digital learning opportunities. Superintendents can take a future ready pledge through the website Future Ready Schools The National Future Ready Framework includes seven gears which include: Curriculum, Instruction, and Assessment; Personalized Professional Learning; Robust Infrastructure; Budget and Resources; Community Partnerships; Data & Privacy; Use of Space and Time; Collaborative Leadership.

Very soon after the national framework was defined, other frameworks that match positions held in school districts started coming into existence.


Very soon after the national framework was defined, other frameworks that match positions held in school districts started coming into existence.
- Future Ready Librarians
- Future Ready District Leaders
- Future Ready Technology Leaders
- Future Ready Coaches
- Future Ready Principals
Each of these groups has their own framework, which can be found here
Once the Future Ready Librarians framework was released, I knew this was an initiative I wanted to be part of. The framework for Future Ready Librarians makes it easy for librarians to see what they should be doing to make transformations in their space and become agents of change in their building(s) This past week I attended the ISTE Conference in Chicago, and the new Future Ready Librarians Framework was released! The new framework is so exciting, because Literacy is such an integral part of the framework!

In addition to providing an excellent framework, Future Ready Librarians offers many webinars, Twitter Chats, a Newsletter and in--person trainings for librarians. Here is a direct link to their website.
What is Future Ready Schools NJ?
Future Ready Schools New Jersey is a coalition between the New Jersey Institute of Technology, the New Jersey School Board's Association, and the New Jersey Department of Education. It is a school certification program designed to support the efforts of the national Future Ready Schools initiative.
In 2016/17 school year, Future Ready Schools NJ began creating task forces to begin writing indicators which are used in each school's certification process. When a school decides to take the path to certification, they must produce evidence under each indicator. The three main areas for certification include: Leadership; Education and Classroom Practice; & Technology Support and Services. As a district works towards certification they accumulate points to get certified, and they can get certified at either the Bronze or Silver level. The Bronze area requires less points than the silver and is a little less involved. Both levels however require a lot of time and effort on a schools part. When a school begins certification efforts, there are three phases they must work through:
- Phase 1: District Committment
- Phase 2: School Participation (This is done by school and not by district)
- Phase 3: School Certification
The nice thing about this initiative is most of the work has been accomplished through educators of New Jersey (Classroom Teachers, Librarians, Administrators) I was fortunate enough to serve on Task Forces, and have recently become involved in the Awards Committee.
My School's Future Ready Certification Endeavors
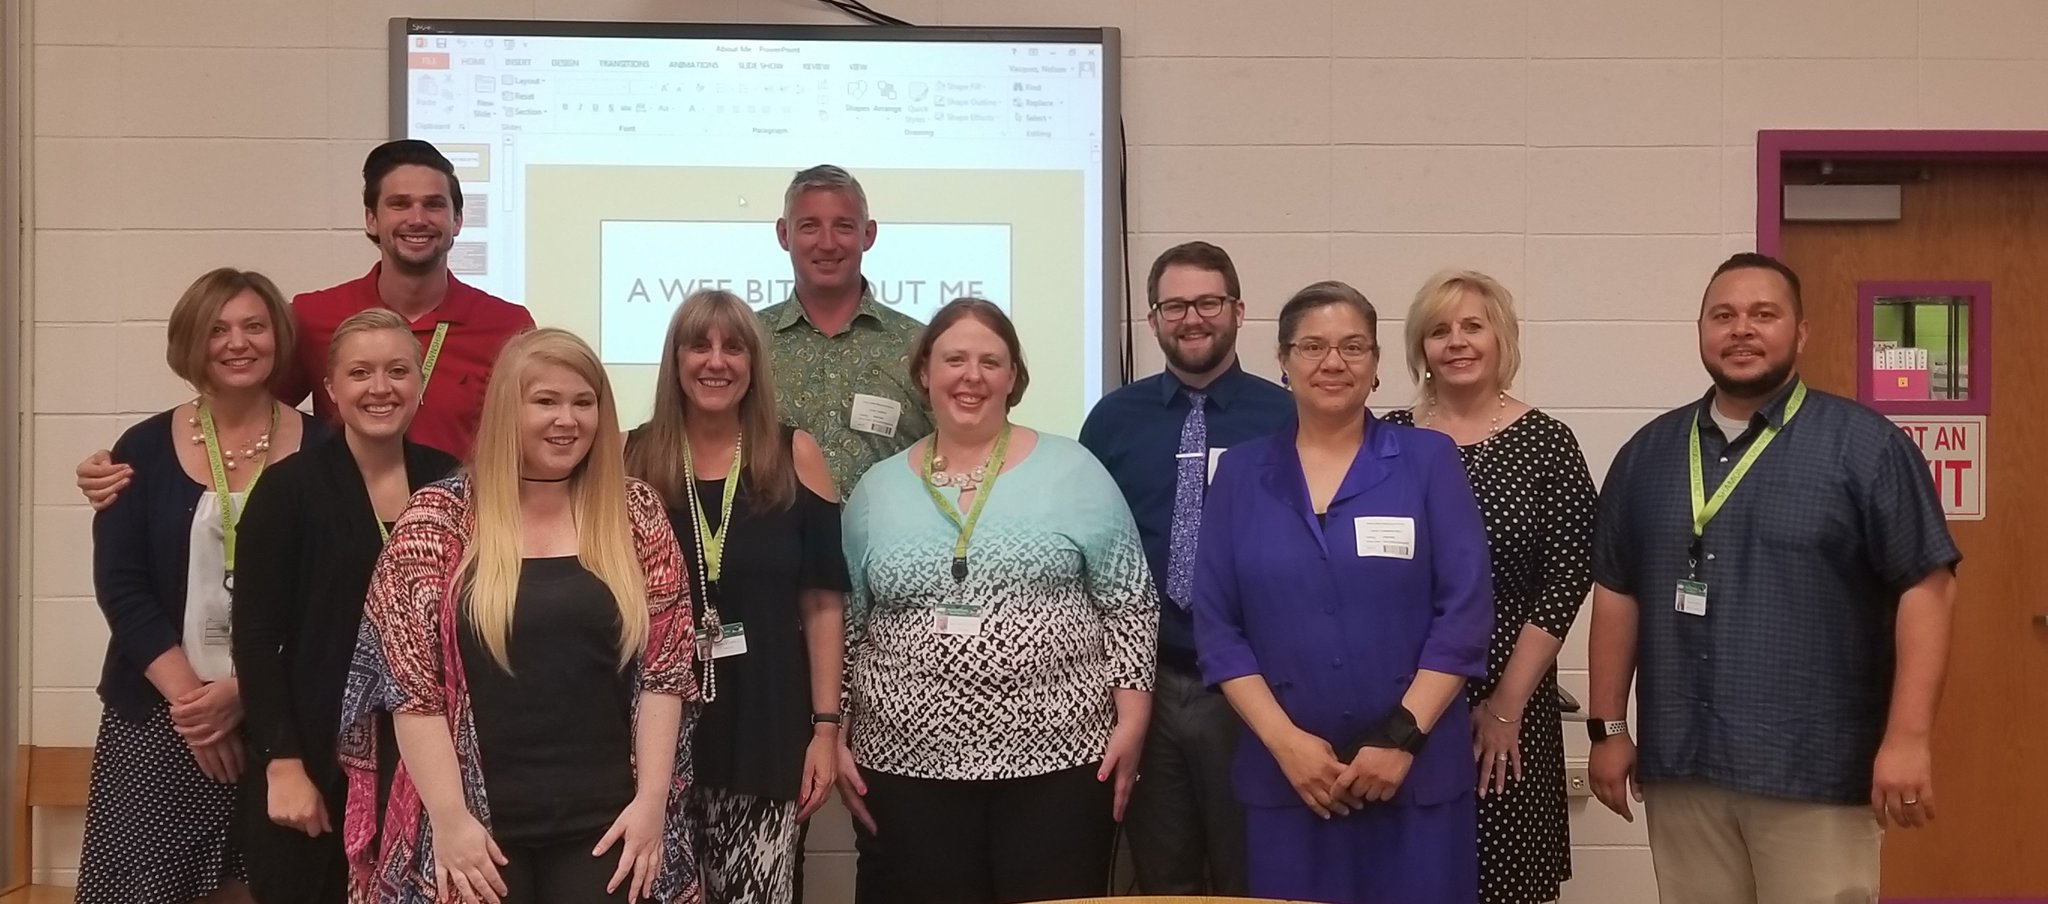
In April of 2017, after serving on the NJ Future Ready Schools Task Forces, I brought the Future Ready School initiative to my superintendent and director of technology. We began communicating with Jeremy Reich (NJ Future Ready School's Project Manager) through a Skype conference. Jeremy explained the steps to us, and we began planning our road to school certification. In October of 2017, we attended one of the national Future Ready School Institutes in Philadelphia area. This was very helpful and allowed the other members of our future ready team to work in breakout groups. This spring my school began working on producing evidence to Future Ready Schools NJ. Our technology director assigned different indicators to different members of our future ready team and we had designated work periods to complete the creation of our evidence. On our final day of meeting, we were thrilled to welcome Jeremy Reich, Linda Carmona-Bell (NJ Department of Education) and Chris Murphy (Principal Extraordinaire from New Zealand) to our school, to show them some of the ways our school is future ready. We are in our final stages of planning/submitting for certification and hope to receive this October of 2018 at the New Jersey School Boards Convention.
Our Future Ready Team and Visitors Jeremy Reich, Linda Carmona-Bell, and Chris Murphy
Monday, May 14, 2018
My Library Genrification Journey
This past summer I took on the project of genrifying our fiction sections. I serve 5-8 grades, and because of this age range, my library has two fiction sections (middle grade fiction and young adult) If you are unsure what genrification is - it's the process of organizing library books by genre. Some librarians are also tackling their nonfiction section, but I choose only to tackle the fiction sections, since nonfiction books are already organized by topic.
There is quite a bit of controversy over the genrification topic. Many librarians are very traditional and believe the best way to organize library books is by author, while the more contemporary thought is to organize by genre because students can find their favorite genre books in one place.
Prior to genrifying, I spent much time asking other librarians who had genrified, reading all that I could read on this idea, and attending presentations on this topic at conferences.
So why did I decide to genrify my collection?
- My middle school population usually requests books by genre anyway.
- I was looking for a way to increase circulation.
- Within each genre books are still organized by author, so students can still learn what a call number looks like and will be able to find books in a library that organized in the traditional manner.
- I felt like this was a good choice for our space.
How did I genrify my collection?
Prior to moving any books, I started going through my collection (this was a good way to not only learn my current collection, but also to weed unwanted books) I began writing the genre of each book on the inside cover.
Over the summer I physically moved the books to their locations. This was the most difficult part of the transition, because at one point I had more piles of books, then I knew what to do with. I kept telling myself that once the books were moved to their designated locations, this would be worth all the hard work.

Once all the books were moved, I was able to add their specific labels.
How did I decide on the labeling?
Since I have two Fiction sections, I decided to have two distinct forms of labeling.
For my middle grade fiction area, I purchased the genre labels from Demco and added these under each spine label.
For my teen fiction area, I purchased the tinted label protectors from Demco and labels that say Teen. We have a chart that students can look at, to match the tints to genre.
What Genres Did I decide to use?
When deciding upon Genres, I choose the Genres that are the most popular in my school.
Middle Grade Fiction Genres
- Action/Adventure
- Animal Stories
- Fantasy
- Historical Fiction
- Holocaust Fiction (This is a big interest to my 6th and 7th graders)
- Mystery/Suspense
- Scary/Horror
- Realistic Fiction
- Science Fiction
- Sports Fiction
- Classics
- Short Story
- Graphic Novels
Teen Fiction
- Action/Adventure
- Dystopian
- Fantasy
- Historical Fiction
- Realistic Fiction
- Mystery/Suspense
- Romance
- Scary/Horror
- Science Fiction
- Sports Fiction
- Classics


Adding Signage
Adding signage is very important when genrifying your collection. We are purchasing signage through Demco, which will sit in front of each genrified area. I also plan to use our Cricut machine to cut out letters and add that to our shelving endcaps.
Final Thoughts
Although genrifying was a ton of work, I am so glad I did it. My circulation has gone up tremendously and students are very excited with the changes in the library. For those librarians who prefer the traditional organization style, I would say, you must do what works best for you and your student population. I am very proud of these changes, and am happy to say this has made a positive impact on my space.
Sunday, March 11, 2018
Creating Amazing Designs With Canva
About four years ago, while attending the PETE&C (Pennsylvania Education Technology Expo and Convention, I found out about Canva for the very first time. I was instantly hooked. Canva makes me look like a graphic artist. I have used it for everything from creating pieces for my library website, posters, brochures, and even task cards for our library makerspace. Just recently, I introduced the program to my 8th graders and they are loving it.
If you've never used Canva before, it is a free program with the possibility of upgrading to a Pro account. Personally, I have never paid for anything, and find that there is enough that is free, upgrading is not necessary.


If you've never used Canva before, it is a free program with the possibility of upgrading to a Pro account. Personally, I have never paid for anything, and find that there is enough that is free, upgrading is not necessary.
Creating an Account
Creating an account with Canva is really easy. The very first time you will need to click on New to Canva? Sign Up! and choose the type of account you want (Education, Small Business, Large Business, etc) Once you have chosen your area you get the choice to sign up through Google or Email. I always choose Google, but if this is not an option for you, Email works well also.

Creating With Canva
Canva is very easy to create with, but it can be overwhelming at first. When you first enter the site, you will get the Dashboard page, which is where all of your projects are stored. To create a new project you will need to first choose which type of project you would like to start. If you can't find anything you like in the immediate list, there is a More Button which gives you many other choices. There is also a Custom Dimensions option.

To pick a type of design, just click on it, and this will bring you to the designing platform. When you begin creating, you have a choice of designing from a ready made template, or adding everything in yourself (backgrounds, text boxes, etc.)
Layouts
Layouts are ready-made templates. Sometimes when I create with Canva, I like to start with a template, and redesign it to suit my needs. If you are using the Free version, make sure you are choosing free items, and not pro items. To choose a layout just click on it and it will appear in your design area.

You will notice right away that any of the items in the template can be clicked on to be changed or deleted. Also take notice that as you click on an item a small box appears, which is the same color as the item you just clicked on. If you click on this box, you will get other color choices. Make your selection and your item will be changed to that color.


You will also notice on your toolbar at the top of your screen you have many editing options, such as:
- Font
- Font Size
- Boldfaced
- Italics
- Justification
- All Uppercase
- Bullets
- Spacing
- Copy an item (note this is not how you copy an entire project)
- Arrange (Moving items to the front or back)
- Transparency
- Adding a Link
- Deleting an item
Elements
The Elements Section contains any items within Canva that you can add, with the exception of backgrounds and text. The Elements Section includes:
- Free Photos
- Grids (Changes the look of your design)
- Frames
- Shapes
- Lines
- Illustrations
- Icons
- Charts
- I Love Canva (Graphics with the word Canva)
To add these items, just click on them and once they are in your project, feel free to resize and move. Some of the graphics even allow you to change the color.

Text
Of course you will want to add text to your documents. You have many choices when it comes to your text.
- Heading
- Subheading
- A Little Bit of Body Text
You can also add Text Designs.

Backgrounds
When adding backgrounds, you have a choice between solid and patterned backgrounds. If you do not see your background you clicked on in your work area, try moving your background so you can see if the background is underneath another background. This can also be accomplished by clicking on the Arrange button at the top of your screen and choosing Back.

Uploads
You may want to add your own images, and Canva makes this very easy. You will need to click on Uploads and add images previously saved to your picture files. If you are using a Chromebook, you can use pictures saved in Google Photos. Once you have uploaded a picture to your Canva account they will stay in your account.
Saving, Printing, and Downloading your Canva Project
As long as you are in editing mode, there is no reason to save Canva. It will save automatically. Once you are ready to download your project, click on Download, and choose the type of file you would like to save it to. It will automatically download to your picture file. If you wish to print your design out, you should download your design first, and once it is downloaded you can print it out.

Canva also has a Share Feature. This will allow you to share your design through Email, Social, Link and Embed.

How I Use Canva
Over the past few years I have found so many wonderful uses for Canva. I have used it to create signs, fliers, Task Cards for my Makerspace, Areas of my Library Website. Shown below are some of my favorite designs.


This school year, I decided to let me 8th graders create with Canva. They are currently creating a poster about themselves using Canva. It has been very exciting watching them create with Canva. I gave them elements they needed to include such as their name, a hobby or interest and something interesting about themselves. I did not tell them where to put their items, what colors to use. I told them that they are the graphic designers. I really am enjoying giving them a voice and seeing all the creativity that's taking place.
Have you created something awesome with Canva? Have you tried using it with your students? I would love to hear about your experiences and see your creations!
Subscribe to:
Posts
(Atom)
Popular Posts
-
 Working as a school librarian poses many challenges. One of the biggest challenges is finding a way to get teachers to collaborate with you...
 -
 Anyone who knows me, knows I am a huge fan of the Mackin company. I cannot say enough good things about them. They are a wonderful company...
 -
 Last year, another teacher from my district I were lucky enough to get funded through our Education Foundation for six of the Breakout Boxes...
 -
 Are you thinking about starting a Makerspace but have limited funds or just are not quite ready to take the plunge? A great way to get your...
 -
 About four years ago, while attending the PETE&C (Pennsylvania Education Technology Expo and Convention, I found out about Canva for the...
 -
 Are you looking for an exciting reading promotion that will get your students to check out more books? Try doing a Blind Date With a Book. ...
 -
Earlier this month I presented to my teachers about how they can use videoconferencing in the classroom. If you are not using Skype or Goog...
-
 This was one of those weeks that just flew by! Packed with meetings and busy times with my students. Our Makerspace has been a huge hit wi...
 -
 This week marked my debut in Cherry Hill School District, NJ. I was so happy to welcome Kindergarten to the beautiful media center. The p...
 -
 It's the night before my first day of 2018/19 school year, and reality is finally sinking in. This was truly a summer of learning. I s...