Sunday, March 4, 2018
English Language Learners (ELL) and School Libraries
This past week I had the pleasure of presenting to The New Jersey English Language Learners Advisory Committee on behalf of New Jersey Association of School Librarians. This group included members of the Department of Education, ELL Supervisors, and ELL Teachers. My presentation was completed with the help of Mrs. Mary Moyer Stubbs who is our Legislative Consultant, various members of NJASL, and the NJ State Library.
I spent the beginning of my presentation talking about the importance of librarians and NJASL.

Librarians and specifically New Jersey librarians are working with ELL Students on a daily basis. Considering the average school's ELL students make up ten percent of the student population, this is no surprise. Some of the areas we are specifically working with ELL Students are: Collection Development, Translating Services, Open Access to the Library, Library Instruction, Collaborating, and Makerspaces.

I spent the beginning of my presentation talking about the importance of librarians and NJASL.

Librarians and specifically New Jersey librarians are working with ELL Students on a daily basis. Considering the average school's ELL students make up ten percent of the student population, this is no surprise. Some of the areas we are specifically working with ELL Students are: Collection Development, Translating Services, Open Access to the Library, Library Instruction, Collaborating, and Makerspaces.
Collection Development
School libraries, as well as public libraries are adding books in other languages to their collection. Many librarians are also asking ELL Students for input in this area. Interlibrary loan is also a really great resource, especially in these times when budgets are getting slashed. In addition to print books audiobooks, ebooks, and databases are also being purchased. Many of these items are available in multiple languages, or they offer a translation feature. Graphic novels are also a fantastic resource for ELL students. They are high interest and the pictures can fill in the gaps for students. Sara Stevenson wrote an awesome article on using Graphic Novels with ELL Students in AASL's Knowledge Quest. http://knowledgequest.aasl.org/english-language-learners-graphic-novels/
Translating Services
Librarians are helping ELL students with translating services. Many websites and databases offer translation features. I personally use MackinVIA to hold all of my library digital resources. Many of the electronic items that I have purchased directly from Mackin offer wonderful translating features on many of their electronic items. Librarians are also translating other items such as directions. One librarian from New Jersey I spoke to told me that she was able to get directions for computer codeing in the Ukraine language.
Open Access to the Library
Libraries are one of the few places in a school or community that offer Open Access to all, and it is no different with ELL students. ELL students are pulled out of their academic classes and the library provides a safe spot for these students.
Library Instruction
Librarians are providing instruction to classes through information literacy lessons, technology lessons, and interactive storytimes. Many librarians are finding that they need to hand tailor their lessons and assignments so ELL students are included.
Collaborating
Collaborating with other teachers is nothing new for librarians. It has always been our job to work with other teachers, to help provides students with pertinent information for assignments. Many librarians are also forming alliances with school organizations that represent ELL students.
Makerspaces
I saved my favorite for last :) This year I started a makerspace in my school library. One of my favorite things about the makerspace movement is students of all levels, languages, and ages can participate in making. Some of the benefits to makerspaces which specifically applies to ELL students include:
- Makerspaces democratize learning
- Makerspaces offer open access to all students
- Makerspaces offer authentic, real world experiences for students
- Makerspace tools are created for speakers of all languages
- Bloxels - offers color coded squares, which turns into a video game handmade by students.
- Little Bits - color coded by the kind of power
- Tinkercad - Software that works with 3D printers - works with shapes, not words
- Legos and K'nex
- Building with Cardboard
- Makerspaces provide opportunities for ELL students and non-ELL students to work together
Our state library also provides many services for ELL community members. Many of the public libraries are also providing services for their local community. Some of these services include:
- NJ Talking Book and Braille Center
- Fade to Books Program - a program that provides books to young boys and teens in urban sections of New Jersey
- ESL classes in New Jersey public libraries
- The state library has compiled a list of bilingual resources for New Jersey community members
In conclusion, this was a wonderful experience. I have presented all over the country, but so far this was the greatest honor I have had. I have included a copy of my presentation on the bottom of this post. It is important for other organizations to learn about libraries and all that we have to offer students and community members.
https://docs.google.com/presentation/d/1WGGeweRMVXSlHcnGFYo49IluiyutAzsxe-QS9YYyDT0/edit?usp=sharing
Saturday, February 24, 2018
Creating Digital Badges With Google Drawings
I have been exploring the world of digital badges for quite some time now. It's a great way to give students a sense of accomplishment and promote their learning. The most difficult for me was finding a way to share the badges with my students. The class I teach Information Literacy, which is really changing to Design Technology (the name will be changed formally by next year) is comprised of many technology projects. Each project is sent to my students through Google Classroom. Yes, we have gone completely paperless, and it's a beautiful thing :) Students receive directions to the project, any links and documents, and a copy of the rubric. My idea is to add the digital badge they receive directly to the rubric. They will be able to save this badge and add it directly to their Google Sites, which serves as a Digital Portfolio. If you are interested in creating a Digital Portfolio for your students through Google Sites, please see my most recent blog post.






Here is What I came up with when I created a digital badge for completing their Google Site
The most common question I get when I show this badge to people is how did you create this. Well, it really is quite simple. The steps below will describe the process I took using Google Drawings.
1. Go to your Google Drive, Choose More and open up a new Google Drawings

2. The first thing you want to do is make your background transparent. This will allow the badge to show the graphics and you won't get a white background.

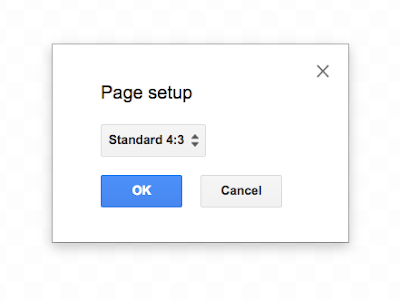
3. Next, you will want to change the size. We are making badges so you will want them to be relatively small. Go to File and choose Page Setup.


Choose Custom

Next, change from inches to Pixels and type in 192 X 192 and Click OK

You will notice that your working area is now much smaller.

4. Now it's time to start designing your badge. Go to Shapes and choose a shape you would like to use. I like to use the Octagon shape, but you can choose a shape you like best.

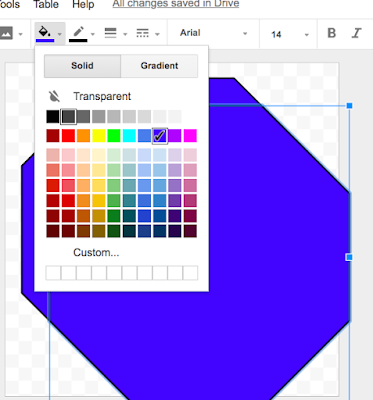
Draw Your Shape and then click on it, so you can fill in your shape with a color. I like to take up the full space, and leave only about one squares length of space on either side.


Once your shape is selected go up the paint bucket and choose a color.

5. Now it's time to start adding in a graphic or graphics that would like to add. Go to upload and add the pictures/graphics you want to add to your badge.

Make sure you have selected your image, so you can resize the graphic to fit inside your badge. I like to add an image from my bitmoji, which is available as a Chrome Extension. This is done by right clicking on the image and choosing copy. Then right clicking once I get to my working area and clicking on paste.


6. The next step is adding the Text for your Badge. Click on The T at the top of your menu and draw a text box in your badge. I like to keep my font in between size 10 and 12, and choose an interesting font.


Next, type in your text. If I am using a dark background, I like to use a light font.


7. If you want to add a shadow effect, this can be accomplished by clicking on your badge and selecting the shape. Next you right click and choose copy, and right click again to choose Paste.


Click on the paint bucket, and choose a darker color, for a shadowed effect. Next, click on arrange on the menu and choose send to back. You may need to resize a bit to get the full shadow effect.


8. Name your Badge.

Go to file and choose Download. Download as a PNG Image. Your file will now be available for you whenever needed.

I hope this tutorial was helpful in learning how to create your own digital badges. I would love to see badges that you are creating. Please share with me :)
Sunday, February 18, 2018
Creating a Digital Portfolio For Students With Google Sites
My students are doing some phenomenal projects in the Information Literacy course I teach, so I decided to give them a way to save all their work in a digital portfolio using Google Sites. There are many different platforms I could have used such as Edublogs, Wix, or Weebly, just to name a few. I choose to use Google Sites as our platform. The new Google Sites is very easy to use, and although users don't have a lot of choices with design, it's a really good first website creation tool for upper elementary and middle school level students. I also like the fact that Google has different levels of privacy, so students have the ability to create a website, publish it to the web, but keep it available only to our school district.
Google Sites is very easy to use. My 6th, 7th and 8th graders all had a very easy time creating their sites. They were asked to create a site to use as a portfolio for all the work they would complete for the year. In the future they will add a page for their new grade level.


Google Sites is very easy to use. My 6th, 7th and 8th graders all had a very easy time creating their sites. They were asked to create a site to use as a portfolio for all the work they would complete for the year. In the future they will add a page for their new grade level.
Directions For Using New Google Sites
- Go to Google Sites https://sites.google.com/
- Choose New Google Sites.

- Click on the Plus Sign on the bottom right hand corner to create a new Google Sites.


- Begin by editing your Header. You can easily change the background image and give your site a name.

- It is also easy to give your site a theme, which will change your header by clicking on themes.

- Ready to add Text, images, You Tube Videos, Stuff from Google Drive, or even Embed items on your site? Google Makes it super easy. Just head over to the insert Section of Google Sites Editing.

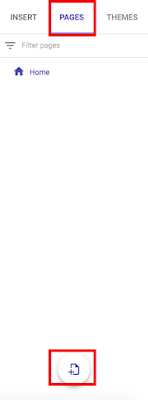
- Need to add a new page. Again this is very easy with Google Sites. Head over to the Pages tab and click on the plus sign located on the bottom right hand edge of the menu.
- Students will need to remember to click on publish in order for all edits to go to the live web version. The first time they publish they will need to add a distinct word or letters to create a URL for their site. I simply had my students add their first initial and last name.
Here are some samples of some of my student's beginning portfolios.


- Students will need to remember to click on publish in order for all edits to go to the live web version. The first time they publish they will need to add a distinct word or letters to create a URL for their site. I simply had my students add their first initial and last name.
Here are some samples of some of my student's beginning portfolios.


Are you doing awesome things with your classes and are looking for a way to showcase this? Consider creating a Digital Portfolio with your students. This is a great way to share with classroom teachers, administrators, and parents. Are you already creating digital portfolios with your students. I would love to hear what you are doing. Please share with me!
Friday, February 9, 2018
Awesome Times at TCEA
This week I had the pleasure of attending and presenting at TCEA (Texas Computer Education Association) Conference in Austin Texas. This was a fabulous conference and I highly recommend attending. Even though it is a state conference, it feels more like a national conference. My husband always says "Everything's Bigger in Texas" and in this case he is most certainly correct.

Some of my highlights of the week included:
1. Presenting to Librarians on My Top 25 Tech Tools For Librarians.
Presenting is one of my favorite things to do, and I always enjoy sharing things that have worked for me, and making new connections.
2. Attending a presentation by Kasey Bell on Google Keep.
I have been following Kasey on Twitter for quite some time now @shakeuplearning and am very impressed with all that she has to offer educators on all areas of Google. I really learned a lot about using Google Keep. It is quickly becoming my new Go To Tool.
3. The Vendor Hall
The vendor hall at TCEA was just amazing! Pretty much every technology vendor was there. Since I have a new Makerspace, and am always looking to expand, the vendor hall always gives me time to explore the newest and up and coming technologies. I was also lucky enough to present for Mackin in the vendor hall on how we used MackinMaker to create our school library makerspace.
4. Hearing Marlee Matlin Keynote
Marlee Matlin was one of TCEA's keynotes and I was so moved by her talk. She spoke of the struggles of becoming an actress with a disability and mentioned many people who were a help to her along her way to success. She ended her speech by explaining what an asset technology has been to those struggling with various disabilities. Such a moving person!
5. Making New Connections
If you have never been to a larger conference, I would recommend you do so soon. I have been to 3 in the past year (ISTE, AASL, and now TCEA) At each of these conferences I have met new educators. You may meet someone if you are presenting, someone who sits next to you at a session you are attending, or someone while you are sitting down taking it all in. It is always a treat for me to talk to new people and learn how they are doing things in their schools.
More information about TCEA can be found at https://www.tcea.org/
Thursday, December 21, 2017
Gingerbread House STE(A)M Competition
 |
| Building in the Makerlab |

The Rules Were as Follows:
- Houses can only be made of paper and crafting materials.
- Houses must be formally entered into the contest to win.
The next thing I had to decide was how the houses would be judged. Should I pick a group of teachers or staff to judge? I decided to give my students a voice by allowing them to vote on their favorite Gingerbread House. Once, all the gingerbread houses were on display in the library, I numbered each house. Students were able to vote once by filling out a ballot with the number of their favorite gingerbread house. The top 3 winners received Amazon gift cards. All winners received a small prize for participating.

I have included some of the items I created for this contest below. Much of what I created was completed using the program Canva. Canva is one of my favorite online tools. I use it for signs, cards. and much more. If you have not used it before, I would recommend it. You will find that it is very easy to use and will make anything you create look fantastic.
This was a highly successful STEM Challenge. Even the students who did not create enjoyed looking at the creations and participating through voting for their favorite. Have you done something similar in your library or classroom? I would love to see pictures and hear about your experiences.
Resources
Gingerbread House Contest Form
Voting Ballots
Thursday, December 14, 2017
Unwrap a Good Book For Christmas
I don't know about you, but I am always looking for awesome reading promotions to do with my students. I teach 5-8, and it can sometimes be a bit challenging to get my 7th and 8th graders excited about reading.
This November, I attended AASL and attended a session on reading promotions at the middle school level. The presenter talked about a reading promotion she ran called Unwrap a Good Book For Christmas. I had done something similar to this last year and Valentine's Day "Blind Date With a Book" and it seemed to go over well, so I thought this would be a perfect fit as well.
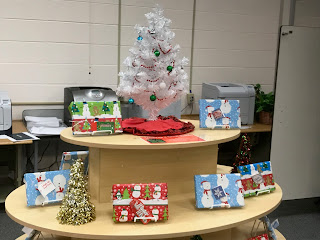
This November, I attended AASL and attended a session on reading promotions at the middle school level. The presenter talked about a reading promotion she ran called Unwrap a Good Book For Christmas. I had done something similar to this last year and Valentine's Day "Blind Date With a Book" and it seemed to go over well, so I thought this would be a perfect fit as well.
Here's How the Promotion Works:
1. Find some awesome books your students would enjoy reading (I picked a bunch of our new books. Books I knew would be awesome reads, but my students hadn't gotten a hold of them yet)
2. Get some gift tags and inexpensive wrapping paper.
3. On the tags write down the barcode number and some hints about the book, such as the book's genre, theme, first line, etc.
4. Wrap the book up.
5. Display them
6. Create a way for your students to tell you about their books. I decided to create a Padlet and have students tell me about their book on there.
7. If you like, give students a little incentive for reading after they complete their mini review. I took a party bag and filled it with candy, erasers, stickers.

My students really are enjoying this reading promotion, and are coming in daily looking for a new book to read. If you are looking for an exciting holiday related reading promotion, this may be the perfect fit.
Monday, December 11, 2017
New Blog Design
Over the past year, I have learned the importance of blogging. It is a great way to share your ideas with others, keep a record of your successes, and make connections with other educators.
About six months ago, I began the process of redesigning my blog. This involved creating a new design for my header. Unfortunately, I have absolutely no artistic skills, at least not when it comes to drawing. My mother is a very talented artist, and even holds a Bachelors in Fine Arts from Moore College of Art in Philadelphia. Who better than her to create a design for my blog? My mother is a huge part of my life and has been an inspiration to me both personally and professionally. I feel blessed to have her in my life. The header symbolizes my love for literature, technology, and design thinking. This school year I was fortunate enough to get funded for a Makerspace. Every day proves to be a learning experience for myself and my students. No matter how challenging the day is, I still always leave my school thinking how much I love our library makerspace.
My blog page was created fully with the help of Christi Fultz of http://www.designbychristi.com/ If you are looking for a blog designer, I would highly recommend Christy. I ended up changing my blog design several times, and she was extremely patient with me, and kept the price the same.
Keeping a blog is challenging, but I highly recommend it. We ask our students to write all the time, but are we writing? My goal for this new blog is to share my ideas, and blog on a regular basis. It is my hope that my posts can inspire educators in the way that I have been inspired by so many of the bloggers that I have followed through the years.
About six months ago, I began the process of redesigning my blog. This involved creating a new design for my header. Unfortunately, I have absolutely no artistic skills, at least not when it comes to drawing. My mother is a very talented artist, and even holds a Bachelors in Fine Arts from Moore College of Art in Philadelphia. Who better than her to create a design for my blog? My mother is a huge part of my life and has been an inspiration to me both personally and professionally. I feel blessed to have her in my life. The header symbolizes my love for literature, technology, and design thinking. This school year I was fortunate enough to get funded for a Makerspace. Every day proves to be a learning experience for myself and my students. No matter how challenging the day is, I still always leave my school thinking how much I love our library makerspace.
My blog page was created fully with the help of Christi Fultz of http://www.designbychristi.com/ If you are looking for a blog designer, I would highly recommend Christy. I ended up changing my blog design several times, and she was extremely patient with me, and kept the price the same.
Keeping a blog is challenging, but I highly recommend it. We ask our students to write all the time, but are we writing? My goal for this new blog is to share my ideas, and blog on a regular basis. It is my hope that my posts can inspire educators in the way that I have been inspired by so many of the bloggers that I have followed through the years.
Subscribe to:
Posts
(Atom)
Popular Posts
-
 Working as a school librarian poses many challenges. One of the biggest challenges is finding a way to get teachers to collaborate with you...
 -
 Last year, another teacher from my district I were lucky enough to get funded through our Education Foundation for six of the Breakout Boxes...
 -
 Anyone who knows me, knows I am a huge fan of the Mackin company. I cannot say enough good things about them. They are a wonderful company...
 -
 About four years ago, while attending the PETE&C (Pennsylvania Education Technology Expo and Convention, I found out about Canva for the...
 -
Earlier this month I presented to my teachers about how they can use videoconferencing in the classroom. If you are not using Skype or Goog...
-
 Are you thinking about starting a Makerspace but have limited funds or just are not quite ready to take the plunge? A great way to get your...
 -
 Are you looking for an exciting reading promotion that will get your students to check out more books? Try doing a Blind Date With a Book. ...
 -
 This week marked my debut in Cherry Hill School District, NJ. I was so happy to welcome Kindergarten to the beautiful media center. The p...
 -
 I have been exploring the world of digital badges for quite some time now. It's a great way to give students a sense of accomplishment ...
 -
 This was one of those weeks that just flew by! Packed with meetings and busy times with my students. Our Makerspace has been a huge hit wi...