Tuesday, October 30, 2018
Research Tools For Students and Teachers
5:04 PM
My library has some amazing resources that can be used for research projects. I know it is tempting to have students get the bulk of their research from Google, and don't get me wrong, there are some amazing resources out there but it is necessary and important for students to gain exposure to a multitude of resources. In this blog post, I would like to explore two of my favorite databases
Are you using either one of these databases? I would love to hear how you are using them with your students.
- EBSCO Explora
- Sirs Discoverer
The key to using these resources in my space is our MackinVIA program. MackinVIA is a program our library uses to house all of our digital materials. Students are able to easily login using their Google usernames and passwords. The program includes databases, ebooks, and audiobooks. Most of the ebooks are available for one user at a time, and can be checked out up to three weeks. Students and teachers can even download the ebooks, using the MackinVIA app. This is a fantastic program and I highly recommend using this free program. I wrote a blog post on this program earlier last year. You can view it here .
EBSCO Explora
EBSCO Explora is a general database that we receive through the New Jersey State Library. The program is divided into three separate databases including:
- Explora For Students (5th/6th grades)
- Explora (7th and 8th grades)
- Explora for Educators
When researching with your students I recommend option one or three, depending on which grade you choose.
Some of the highlights of this program include:
- Searching by topic
- A specific search box
- The ability to get full-text documents (Magazines, Newspapers, Journals)
- Students can send an entire article to their Google Drive
- Ability to limit your search by publication date
- Ability to limit your search by Lexile Range
- Ability to listen to the article (Speech to Text)
- Citation information available, and easy to copy and paste
Here is an excellent tutorial I found on using Explora, created by EBSCO.
SIRS Discoverer
SIRS Discoverer is another wonderful general database, specifically geared towards middle school students. Our school has chosen to purchase this program, because it is one of the only programs that is available for this level. You will find that it has many of the same features as Explora, but unlike Explora the articles are more specific to middle school level.
Some of the highlights of this program include:
- A specific search area
- Search by topic
- An Explore Features area which includes
- Animal Facts
- Current Events
- Pro/Con Leading Issues
- Country Facts and Maps
- Nonfiction Books
- Science Fair Explorer
- An Advanced Search area
- Ability to limit search by media
- Ability to limit search by grade level
- Ability to limit search by Lexile Level
- Full text articles
- Ability to send articles to students through Google Classroom
- Ability for students to save articles to their Google Drive or print.
- Citation information
- There is also an Educators Resources section
Here is a video with more information about using SIRS
Just recently I was asked to be part of the Proquest (Publishers of SIRS Discoverer) Advisory Board. This is very much an honor end exciting to be part of decisions they are making with their various databases.
Here is the video of the presentation I put together on MackinVIA and these databases.
Are you using either one of these databases? I would love to hear how you are using them with your students.
Saturday, October 27, 2018
STEM Challenge: Build a Marble Maze
7:21 AM
My students really enjoy participating in the Monthly STEM Challenges that are available to them during an open media center time. Even though we are a middle school, our students still have a daily recess. This really gives them time to unwind, so they can focus on their academics. During recess students can sign up to come to the library. The STEM Challenge is just one of the activities students can participate in. Students can also use a computer, study, check out a book, read, play a board game, or use the makerspace. The Monthly STEM Challenge consists of a challenge that has a STEM focus. Students are given a month to work on this challenge. At the end of the month, the challenges are put on display, so that students in the school can vote on their favorites. A small prize and certificate is given to all students who participate in the challenge.
In September our STEM Challenge was Create a Marble Maze. Students were provided with:
In September our STEM Challenge was Create a Marble Maze. Students were provided with:
- Cardboard
- Straws
- Tape
- Glue
- Popsicle Sticks
I also like to create a STEM Planning sheet. Students need to plan out their project prior to creating. This includes deciding which materials they will use, sketching their design, and after they complete the challenge, figuring out what worked and what failed. I tell my students that they can not participate in the challenge, if they do not fill out this paper. This is how I add in the engineers design process. I am a firm believer that this process should be a part of any and all making.
Here are some pictures of some of my students who participated and their finished challenges.
As you can see this was a lot of fun. My students really enjoyed themselves. It is always amazing to me that students are willing to give up their recess and own time to participate in these challenges. It shows me that students are motivated to create and design, and is very encouraging.
Sunday, October 21, 2018
Game Design With Bloxels
8:44 AM
Bloxels is an innovative way for students to create video games. The games can be turned into an educational game simply be adding white story blocks to the game. How many times do we ask our students to showcase what they learned? A book report, a science topic, a moment in history, a math lesson. The possibilities are endless. Next time instead of going for the traditional Google Slides or Poster try out Bloxels.
So you are probably wondering, how does Bloxels work? Your students really only need a Bloxels Kit (Our library has 11 of them, an IPad, and the Bloxels (free) app. To begin, students create their game board by inserting the colored cubes into the Bloxels black board. The colors are extremely important when designing the game board.
Green = Terrain
Blue = Water
Purple = Enemies
Orange = Exploding
Red = Danger
Yellow = Coins
Pink = Powerups
White = Story blocks
Once your students have finished building their game boards, they are able to take a picture of the board using the Bloxels App. The Board will now magically be added to your Bloxels program. Students can easily assign meaning to some of the types of blocks such as Enemy Blocks, Powerups, and Story Blocks. This is completed through the Configure setting.
Once students have configured their game, they can choose to begin playing their game, or create their own game character. The process for creating their own game character is very similar to creating a game board. Students can build a game character using the Bloxels black board and take a picture. The picture that is taken turns that character into a real game character, The game character can then be inserted into the game and students can begin playing the game.
Bloxels has included a teachers manual with directions for playing, as well as lesson plans. This is available both in print and online.
Recorded Version of Bloxels Presentation
Thursday, October 11, 2018
What's New With Google Classroom?
5:37 PM
Over the summer, Google made some exciting changes to Classroom. Some are extremely noticeable and others not so much. If you are using Classroom on a regular basis, you may have already noticed the changes.
1. The Stream Screen Has Changed
In the past, the Stream Screen was a place for students to view all assignments, etc. It is now only a place for announcements or comments. Since the switch, I have not been using this area a lot. I make very few announcements and very few of my students comment. If you are making many announcements and allowing student commenting, this area may work for you.
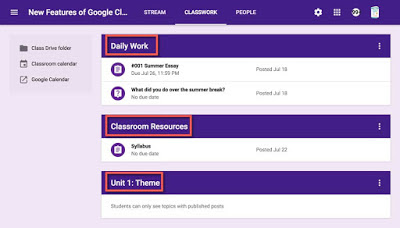
2. The Addition of the Classwork Screen
The Classwork Screen has been added, and Students is now called People. The Classwork Screen is the area where all assignments, and questions are added. Teachers can also list materials. This makes it super easy to post assignments. Teachers can also categorize by topic. This is my favorite addition to the new Google Classroom. It is so much less confusing when posting assignments.
Still need more information? Please watch my video below with all the information that was presented at a live presentation I shared with my staff.3. The About Tab is Gone (Sort of)
The old version of Google Classroom had an About Tab. This was a place to share information about your class, as well as to list materials that were used on a regular basis. Teachers can now list Materials under Classwork. About can be found on the Stream Screen underneath your Header, now as a link. When you click on About, you will receive information about the Class Code. This is a more convenient way to push out the Class Code to your students.
4. Settings All in One Place
The settings for Classroom are now all available in one place. No more searching for how to set certain things up. You can find settings at the top right hand side. Here you can do things like reset the class code, decide whether to show deleted items, and set up guardian summaries.
5. Ability to Copy a Class
Google Classroom now gives you the ability to copy a class. Simply go the menu that shows all of your Google Classrooms and click on the three dots. You will see a choice to copy. Copying does not copy your students or announcements, but will copy everything else. This is a great timesaver, if you are doing the same curriculum/projects on a yearly basis.
6. Feedback/Grading Workflow
Google Classroom has always given you the ability to grade assignments, but it used to be much more difficult to do this. Now each student is listed. You will notice as you scroll through that each assignment pops up. Teachers are also able to give instant feedback.
7. Ability to Turn Off Notifications
Google Classroom has always allowed you to turn off email notifications for all of Classroom. Now teachers are able to turn off notifications for a specific class. To do this, you must click on the menu bar to the left. You will see notifications at the bottom. Once you click on Notifications, you will see choices for all of your classes. If you keep scrolling down you will see Notifications for individual classes.
Subscribe to:
Comments
(Atom)

Contact Me
Popular Posts
-
Anyone who knows me, knows I am a huge fan of the Mackin company. I cannot say enough good things about them. They are a wonderful company...
-
Working as a school librarian poses many challenges. One of the biggest challenges is finding a way to get teachers to collaborate with you...
-
Last year, another teacher from my district I were lucky enough to get funded through our Education Foundation for six of the Breakout Boxes...
-
Are you looking for an exciting reading promotion that will get your students to check out more books? Try doing a Blind Date With a Book. ...
-
Are you thinking about starting a Makerspace but have limited funds or just are not quite ready to take the plunge? A great way to get your...
-
About four years ago, while attending the PETE&C (Pennsylvania Education Technology Expo and Convention, I found out about Canva for the...
-
This was one of those weeks that just flew by! Packed with meetings and busy times with my students. Our Makerspace has been a huge hit wi...
-
Over Winter Break I did some serious thinking about my blog, and decided to keep more of a running log of my weeks. This will be a great re...
-
It's the night before my first day of 2018/19 school year, and reality is finally sinking in. This was truly a summer of learning. I s...
-
This week proved to be a fun but tiring week. After a little over a week off for Winter Break and a four day week following that, five days...
Powered by Blogger.


